
How to make a Burning Bridges AI video with your own cast
To make a Burning Bridges AI video, upload a lead photo, add any optional background portraits, then generate from the prepared scene. Your most useful decision comes before you click: who should carry the performance, and who actually needs to change behind them? Open the Burning Bridges AI tool when your cast is ready.
Create a Burning Bridges AI video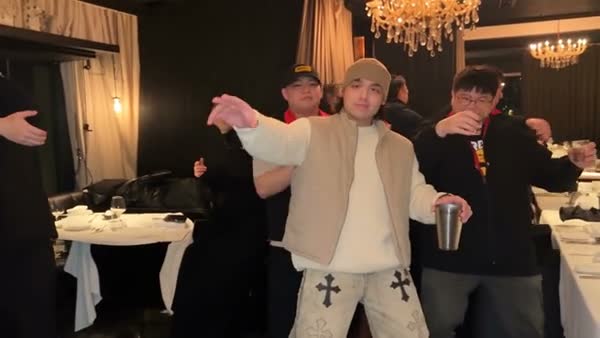
Read the scene before choosing your cast
Burning Bridges AI follows a crowded indoor performance. The lead moves toward the camera, gestures around a metal cup, and shares the frame with several other people. Those interactions matter as much as the face. A portrait that looks sharp as a small avatar can still leave the model guessing about shoulders, clothing, and the hands that move across the body.
Watch this community adaptation for the relationship between the foreground performer and the room. It is an illustration of the casting idea. In your own result, check the cup crossing the torso and the people entering behind the lead. Do not judge the whole transformation from one attractive opening frame.
The prepared Burning Bridges AI reference runs for about 29 seconds. Its framing, movement, and soundtrack define the scene. You do not need to find a matching room, film a performance, or upload the song. The dedicated page already has the reference and role instructions loaded.
Decide which people need new appearances
Start with the foreground lead
Choose one person who should hold the audience’s attention. A waist-up or fuller portrait with clear shoulders gives more useful wardrobe information than a tiny face crop. Pick a photo whose clothes belong in your idea; the image communicates appearance as well as identity.
Add background people deliberately
You can add up to five optional background photos after the lead. Use one person per image. Leave this group empty when the joke or story only needs a new central performer. Adding more portraits does not create new places in the crowd.
For a group version of Burning Bridges AI, arrange the supporting photos from left to right according to the people’s initial positions in the reference. This is guidance for the edit. The page does not let you click an individual person in a frame to bind a portrait to them, so overlapping faces and fast entrances can produce uncertain assignments.
A useful first plan is one distinctive lead and one clearly different supporting person. If everyone wears the same color and has similar hair, it becomes harder for you to spot an assignment error. Distinct silhouettes let you evaluate the result without relying on tiny facial details.
Prepare photographs that explain the whole character
Choose the original camera photo when you have it. A screenshot of a social post may include text, filters, a small face, and other people. Crop away unrelated subjects while keeping the shoulders and enough torso to show the outfit. Look for even light and a face that is not covered by a hand or a large object.
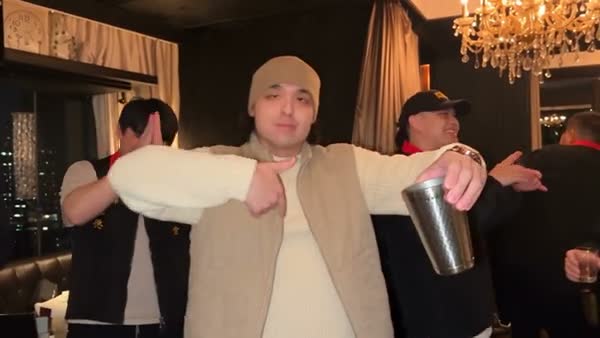
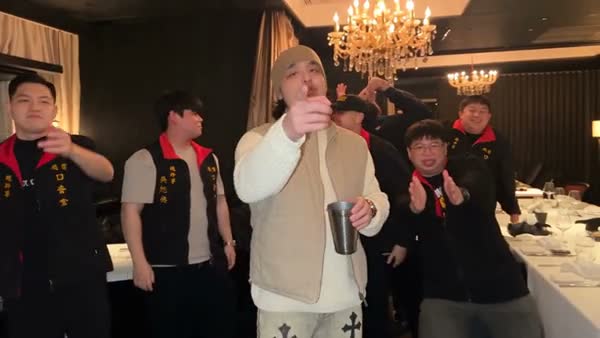
You do not need to hold a cup in your upload. The reference already supplies that action. A relaxed portrait can describe the character more clearly than a staged pose that hides the chin or folds the arms over clothing. Small jewelry, lettering, and unseen parts of an outfit may still change when the model creates moving frames.
Use separate files for separate people rather than a collage. Before uploading, open each image at normal viewing size and ask whether a stranger could identify the intended subject immediately. If the answer depends on explaining which person to choose, simplify the image first.
Make your Burning Bridges AI video
1Load and inspect the lead
Open the Burning Bridges AI workspace and choose Upload lead photo. Check the thumbnail for the intended person and wardrobe. Selecting a file alone does not submit a generation task.
2Arrange any supporting photos
Use the optional Background upload area for your supporting cast. Check their order before moving on. Replace a photo to change its appearance reference; when removing a cast member, work backward from the last image so the remaining roles retain their positions.
3Check Settings and the credit estimate
Open Settings near the Generate action to choose an available resolution. Duration and framing follow the source. The prepared prompt is already applied, so no prompt-writing step is required. Read the current credit amount before submitting; increasing resolution does not guarantee better character tracking.
4Generate and review the finished task
Sign in when requested, then select Generate once the photos are ready. Follow that task in My creations. When it finishes, play the whole result with sound and download the version you have checked. Open library gives you a way back to your saved work.
Check three moments before sharing
A face changes after the cup passes
Pause just before and after a hand or the cup covers the face. Compare the jaw, hairline, and visible outfit, rather than only the expression.
A clearer lead photo with less facial obstruction may give the next attempt better information. Save the existing result first and decide whether the issue is significant enough to try again.
A supporting person takes the wrong appearance
Follow the same person across their first entrance and the next camera movement. Background ordering can become ambiguous when several people overlap.
Recheck the upload order and reduce the optional cast if only one or two replacements are necessary. More photos cannot guarantee more accurate assignments.
The opening looks good but the end does not
Watch the closing seconds as carefully as the start. Check continuity of clothing and proportions, then listen for the included reference soundtrack.
Review the downloaded file as well as the small preview. Keep the full landscape framing if cropping would hide the interactions that make the scene readable.
Burning Bridges AI results can vary with the same inputs. Better photos can reduce ambiguity, but no combination guarantees stable hands, faces, or every background assignment. Check a completed task before deciding to spend credits on a different cast or another attempt.
Take the idea beyond this scene
If you need to prepare an original outfit or character portrait, use the AI Image generator and review that still before bringing it into the performance. For a different scene or your own prompt, open the AI Video generator and choose a model and input mode that support your intended references. The fixed Burning Bridges page remains the direct route for this prepared performance.
Burning Bridges AI tutorial questions
Does Burning Bridges AI require background photos?
No. One lead photo is enough. Background uploads are optional and limited to five separate photos. Use them only for people you want to recast.
Where do I write the Burning Bridges AI prompt?
The dedicated tool applies prepared instructions. Its Settings panel offers resolution, while duration and framing follow the reference. Use the general AI Video page if you want to work with your own prompt.
Can I select every person in the room individually?
There is no per-person frame selection. Background photos provide ordered appearance references, and overlapping people may be assigned inconsistently. Review who actually changes in the result.
Do I need to add the song after generating?
The reference soundtrack is included in the finished performance. Listen to the completed result before downloading and sharing it.
Give the lead a clear identity
Choose your strongest portrait, keep the supporting cast intentional, and start with the prepared performance.
Create a Burning Bridges AI video